Chocolate Mint Cake with Fresh Milled Flour (dye-free)
This from scratch Chocolate Mint Cake made with freshly milled flour is the perfect balance of rich chocolate and refreshing mint. The soft, fluffy cake is layered with a smooth mint frosting, then finished with a rich chocolate topping. Made with simple, wholesome ingredients, this cake is ideal for holidays, birthdays, or anytime you’re craving a classic chocolate-mint dessert. If you love moist chocolate cake paired with a cool, creamy mint flavor, this homemade chocolate mint cake recipe is sure to become a favorite.

This post contains affiliate links, which means I make a small commission at no extra cost to you. As an Amazon Associate I earn from qualifying purchases. Please read our Disclosure Policy.
Jump to RecipeWhy Fresh Milled Flour?
Fresh milled flour is made by grinding whole grains just before baking, which helps preserve nutrients that are lost in processed, store-bought flour. Because the entire grain is used—bran, germ, and endosperm—it provides more fiber, vitamins, and minerals. Many people also find fresh milled flour easier to digest, making it a wholesome choice for everyday baking.
I have the NutriMill Classic. I use mine several times a week and have had no issues in over two years. It is a great, affordable grain mill.
Making the Chocolate Cake
Start with milling your grains, soft white wheat will work best. Mix flour, baking soda, baking powder and salt in a small bowl. Heat the water and mix in the cocoa, vanilla and coffee, and allow to bloom. Meanwhile melt the butter, then mix with the eggs, brown and white sugar, milk, and sourdough starter. (Adding sourdough starter is optional. If you do not have sourdough starter simply omit it.) Add the hot water mixture to the rest of the wet ingredients and mix well. Add the dry ingredients and mix till combined. Allow the batter to rest while the oven preheats. Freshly milled flour takes longer to absorb moisture compared to commercial, highly processed flours. Resting gives the flour time to fully hydrate, which prevents the final product from having a gritty or sandy texture. Once the oven is preheated, pour the batter into a well-greased 9×13 pan. Bake for 30–40 minutes, or until a toothpick inserted in the center comes out clean. Let cool completely.

Cake baked and cooled, ready for the filling.
Making the Mint Filling
In a mixing bowl, add the softened butter, powdered sugar, water, and mint extract. Beat on medium speed until the frosting is smooth, light, and creamy, scraping down the sides of the bowl as needed. For a naturally green color, you can optionally add a small amount of chlorophyll or matcha powder. This creates a beautiful mint-green frosting without using artificial food dyes. Once the chocolate cake has completely cooled, evenly spread the mint frosting over the top. Place the cake in the refrigerator to allow the frosting to firm up and set.

I used chlorophyll to make it such a pretty green!
Making the Mint Topping
Prepare the chocolate butter topping next. Next, melt the butter over low heat, then add the chocolate chips. Stir constantly until the chocolate melts completely and looks smooth and glossy. Remove the pan from the heat and let the mixture cool for about 30 minutes, stirring occasionally, until it feels lukewarm. Spread the chocolate topping evenly over the chilled mint layer. Once complete, chill the cake again until set, then slice and serve.
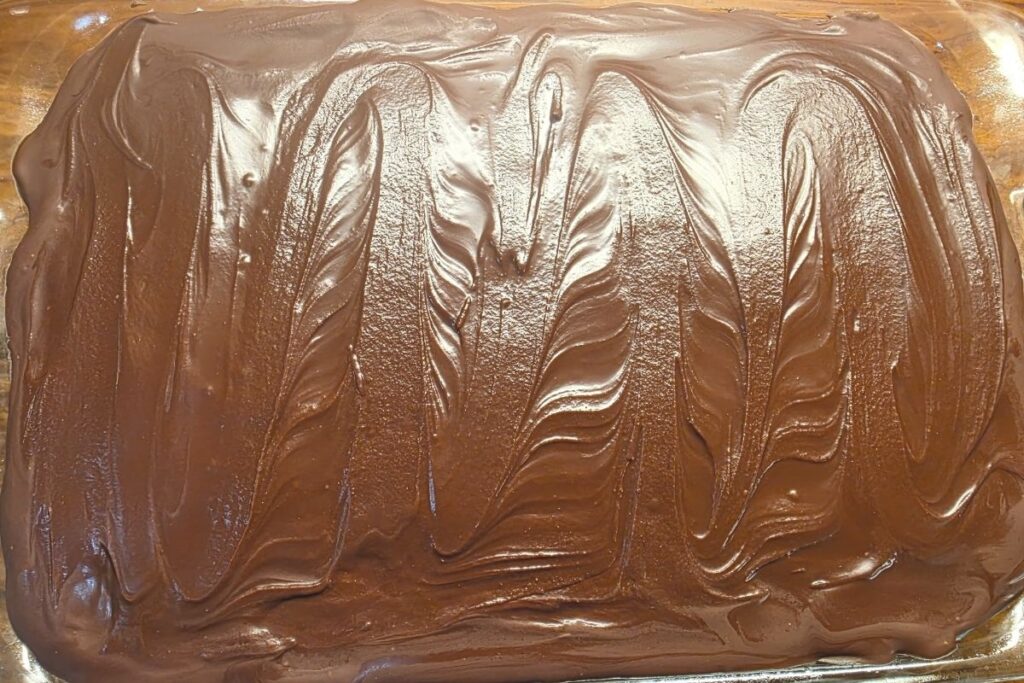
Delicious rich chocolate topping for the final touch!
Storing Chocolate Mint Cake
Store leftovers covered in the refrigerator.
Tips:
Mixing cocoa powder with hot water, a process called “blooming,” intensifies its chocolate flavor, creates a richer aroma, helps it dissolve smoothly without lumps, and results in moister, fudgier texture by activating the cocoa solids and reducing bitterness. The hot liquid breaks down cocoa’s natural fats and releases its full flavor potential, a key step for deep chocolatey results in baked goods like brownies.
Freshly milled flour is finer and takes longer to absorb moisture compared to commercial, highly processed flours. Resting gives the flour time to fully hydrate, which prevents the final product from having a gritty or sandy texture.

How to make your own brown sugar:
A simple way to make your own brown sugar is to mix cane sugar (or regular granulated) with molasses. I use 200 (1 cup) grams organic cane sugar to 1 tbsp molasses. You can adjust this to how dark you want your sugar. I like the Golden Barrel brand, and have used both the baking molasses or the blackstrap molasses. Both are delicious, the blackstrap has a stronger flavor though. I personally love the Blackstrap flavor. Hand mixing works, but it does take a while to incorporate. To bulk make it, I fill my Bosch and use the wire whips to mix it up in a few minutes.
Shop the equipment/ingredients you’ll need:

Chocolate Mint Cake with Fresh Milled Flour (dye-free)
Equipment
- 1 9×13 cake pan
Ingredients
Cake
- 360 g fresh milled soft white wheat 3 cups
- 2 tsp baking soda
- 1 tsp baking powder
- 1 tsp salt
- 1 cup butter 2 sticks
- 2 eggs
- 200 g brown sugar 1 cup
- 100 g white sugar 1/2 cup
- 240 g milk 1 cup
- 125 g sourdough optional
- 240 g hot water 1 cup
- 50 g cocoa powder 1/2 cup
- 1 tsp vanilla
- 1 tbsp coffee or espresso powder
Mint Filling
- 240 g powdered sugar 2 cups
- 1/2 cup butter, softened 1 stick
- 1 tbsp water
- 1/2 tsp mint extract
- chlorophyll or matcha for green color optional
Topping
- 11 oz chocolate chips
- 1/2 cup butter 1 stick
- 1/2 tsp mint extract optional
Instructions
Chocolate Cake
- Mill grains (soft white wheat works best).
- In a small bowl, mix flour, baking soda, baking powder, and salt.
- Heat water and stir in cocoa, vanilla, and coffee; let bloom.
- Melt butter and mix with eggs, sugars, milk, and sourdough starter.
- Add cocoa mixture to wet ingredients, then stir in dry ingredients until just combined.
- Let batter rest while oven preheats.
- Pour into a well-greased 9×13 pan and bake 30–40 minutes, until a toothpick comes out clean.
- Cool completely.
Mint Filling
- Combine the softened butter, powdered sugar, water and mint extract and beat till creamy. Optionally, add chlorophyll or matcha to make it green – it makes a fun color without adding food dyes.
- Spread over cooled chocolate cake.
- Refrigerate until set.
Topping
- Melt butter, then pour in chocolate chips. Keep over low heat and stir till all the chocolate is melted.
- Let cool for 30 minutes or until lukewarm; stirring occasionally.
- Spread over filling.
- Chill before cutting.
- Store in refrigerator.
Notes
Did you make this?
If you love this recipe, please take a minute to leave a rating and review—it truly means so much to me. Make sure to follow us on Pinterest for more delicious and nutritious recipes!